Using Your Class Virtual Machine
Every student in the class will have their own virtual machine (VM) to do work. We highly recommend that you use your class VM to work on the in-class exercises and take-home projects. The VMs have the Linux OS and and some other software installed for you that will make getting started easier. Also, we (the teaching staff) have access to all of the VMs and can help you in case something goes very wrong.
SSH Access To Your VM
Once you have provides the instructors with your TACC account and your VM has been created, you can use the following steps to ssh to it. For security purposes, the student VMs will be behind a firewall and will not be directly accessible to the public internet.
To access your VM via SSH, you will need to first SSH to the login VM. This year, the login VM will be located at: coe332-2026.tacc.cloud
Steps to SSH to Student VM:
First, SSH to the login VM (coe332-2026.tacc.cloud) using your TACC username, password and MFA token.
From
coe332-2026.tacc.cloud, typessh coe332-vm. This should connect you to your personal VM as userubuntu.
You should see the prompt change in your terminal. The two steps are depicted below:
Step 1: SSH from your laptop to student-login:
[local]$ ssh username@coe332-2026.tacc.cloud
(username@coe332-2026.tacc.cloud) Password:
(username@coe332-2026.tacc.cloud) TACC_Token:
 Welcome to Ubuntu 24.04.3 LTS (GNU/Linux 6.8.0-90-generic x86_64)

 * Documentation:  https://help.ubuntu.com
 * Management:     https://landscape.canonical.com
 * Support:        https://ubuntu.com/pro

 System information as of Fri Jan  9 12:07:19 CST 2026

 System load:  0.02               Processes:             140
 Usage of /:   11.4% of 37.70GB   Users logged in:       1
 Memory usage: 9%                 IPv4 address for ens3: 129.114.35.192
 Swap usage:   0%


 Expanded Security Maintenance for Applications is not enabled.

 0 updates can be applied immediately.

 Enable ESM Apps to receive additional future security updates.
 See https://ubuntu.com/esm or run: sudo pro status


 Last login: Thu Jan  8 14:09:53 2026 from 136.62.142.180
 jstubbs@bastion-9:~$
[coe332-2026]$ ssh coe332-vm

 Welcome to Ubuntu 24.04.3 LTS (GNU/Linux 6.8.0-90-generic x86_64)

 * Documentation:  https://help.ubuntu.com
 * Management:     https://landscape.canonical.com
 * Support:        https://ubuntu.com/pro

 System information as of Fri Jan  9 18:08:55 UTC 2026

 System load:  0.0                Processes:             183
 Usage of /:   2.5% of 153.94GB   Users logged in:       0
 Memory usage: 1%                 IPv4 address for ens3: 10.10.29.135
 Swap usage:   0%

 * Strictly confined Kubernetes makes edge and IoT secure. Learn how MicroK8s
 just raised the bar for easy, resilient and secure K8s cluster deployment.

 https://ubuntu.com/engage/secure-kubernetes-at-the-edge

 Expanded Security Maintenance for Applications is not enabled.

 3 updates can be applied immediately.
 To see these additional updates run: apt list --upgradable

 Enable ESM Apps to receive additional future security updates.
 See https://ubuntu.com/esm or run: sudo pro status


 Last login: Thu Jan  8 21:28:43 2026 from 10.10.29.250
 ubuntu@student-1:~$
Working With VSCode and the VM
We will be writing code in VSCode this semester, a modern Interactive Development Environment (IDE) with many advanced features for software engineering such as syntax highlighting, code completion and interactive debugging. Our setup will involve having VSCode running on your local laptop while all the actual code we write and execute will run on your dedicated VM. In this setup, you can think of VSCode somewhat like a “web browser” with the actual source code living on the VM.
There are a few advantages to this approach, including:
Your code can be accessed remotely from different computers, and different individuals can access the running code (including the instructors and TAs, who can help troubleshoot issues);
All students code will execute in the same environment (Linux OS with the same CPU cores and memory, etc.)
Installing VSCode on Your Laptop
Hopefully everyone had a chance to install VSCode onto their computer last time. If not, here are instructions again, for Windows, Mac, and Linux:
Remember, you only need to follow the first step to install the actual VSCode application. Next, we’re going to install the following additional extensions.
Installing the Necessary VSCode Extensions
Open the Extensions view by either clicking Extensions from the left navbar (the icon with two squares and a diamond) or by using the Ctrl+Shift+X (Linux/Windows) or Cmd+Shift+X (Mac) key combination. You will see the extensions organized into listed of “Installed”, “Recommended”, etc. You can also search for extensions by typing into the search box. Install the following extensions:
Python (from Microsoft) – Core Python development functionality.
Pylance (from Microsoft) – Advanced Python development features (requires the Python extension).
Black Formatter (from Microsoft) – Auto-format Python code (also requires the Python extension).
Remote-SSH (from Microsoft) – Provided support for developing code on remote servers using an SSH connection.
To install an extension, click the extension from the Extensions tab and then click “install”.
Warning
In general, make sure you are installing VSCode extensions from Microsoft or a trusted source. If you search for popular extension names, such as “python”, you likely to find multiple extensions.

Installing the Python extension.
VM Setup: The Python uv Tool
We’ll also be using Python uv, a modern tool for managing local installations of
Python packages in virtual environments as well as entire python installations
themselves. We will be combining uv with Docker later in the semester for highly
reproducible, portable software distributions.
Installing Python uv
To install uv on your Ubuntu VM, run the following:
[coe332-vm]$ curl -LsSf https://astral.sh/uv/install.sh | sh
This one command should be all that is required to get uv installed. You can test
the installation with the following command
(note: you will need to exit the current SSH session and reconnect to get the uv
script on your local path; alternatively, you can source our bashrc file):
[coe332-vm]$ uv

An extremely fast Python package manager.

Usage: uv [OPTIONS] <COMMAND>
. . .
Managing Python Installations with uv
One great thing about uv is that it can manage multiple Python installations, in addition
to packages associated with a specific Python project. We can list the specific Python versions
that uv finds installed on the local machine and the ones available for download with:
[coe332-vm]$ uv python list
cpython-3.15.0a3-linux-x86_64-gnu                 <download available>
cpython-3.15.0a3+freethreaded-linux-x86_64-gnu    <download available>
cpython-3.14.2-linux-x86_64-gnu                   <download available>
cpython-3.14.2+freethreaded-linux-x86_64-gnu      <download available>
cpython-3.13.11-linux-x86_64-gnu                  <download available>
cpython-3.13.11+freethreaded-linux-x86_64-gnu     <download available>
cpython-3.12.12-linux-x86_64-gnu                  <download available>
cpython-3.12.3-linux-x86_64-gnu                   /usr/bin/python3.12
    . . .
To install a specific Python, use:
[coe332-vm]$ uv python install <python_version>
For example, ensure Python 3.14 is installed with the following command:
[coe332-vm]$ uv python install 3.14
If all goes well, you should see a message:
Installed Python 3.14.2 in 1.48s
  + cpython-3.14.2-linux-x86_64-gnu (python3.14)
We’ll be using Python 3.14 throughout the semester.
Creating Projects with uv
The uv tool has the concept of a project, which allows you to manage the Python installation (i.e., version)
together with any packages needed for the code you are writing. Projects are associated with git repositories. In general,
you will want to create a new uv project for each git repository you work on.
To create a new project, simply issue:
[coe332-vm]$ uv init <project_name>
For example, let’s create an in itial uv project to hold our the work we do in class:
[coe332-vm]$ uv init class-work
This creates a new directory, class-work, in the current working directory that includes the following
files:
.git/
.gitignore
.venv
.python-version
README.md
main.py
pyproject.toml
You might first notice that it created the .git directory and a .gitignore file – it has set up the directory
to be a git repository. As mentioned, each uv project is intended to be a git repository.
It also created a pyproject.tonl file.
The pyproject.toml file records specific metadata about the Python version and packages that
your project depends on. Let’s take a look at the contents:
[coe332-vm]$ cat pyproject.toml

[project]
name = "class-work"
version = "0.1.0"
description = "Add your description here"
readme = "README.md"
requires-python = ">=3.14"
dependencies = []
Here we see tha name of the projecct (class-work), the version of the project (0.1.0 since we didn’t specify anything),
and some other metadata. For instance, we see requires-python = ">=3.14" indicating that the project requires at least
Python 3.14, but a higher version would be acceptable. At the moment, we also see that dependencies is an empty list —
we haven’t specified any library dependencies yet. More on this momentarily.
You can think of the pyproject.toml file as providing a minimum
specification of the environment required to execute your code correctly. Once any dependencies are installed however,
uv records the exact requirements in a lock file.
We’ll revisit the uv.lock file a bit later.
A Word on Python Packages
The Python programming language includes many modules and packages for common programming
tasks as part of the standard library. These packages come with Python itself — once you
have downloaded and installed Python, there is nothing additional you need to do to use the
package: simply import it into your script and you can being using it. Examples include the
json library, for working with JSON data (which we will use in the next class), the
os package, for working with files and directories, and the re package for leveraging
regular expressions.
At the same time, there are many more third-party packages that you can install to add
additional functionality to your programs. For example, the requests package provides an
excellent API for making HTTP requests, and the fastapi package provides a framework for
developing HTTP services. Unlike packages from the standard library, third-party
packages must be downloaded and installed before they can be used.
Many of these packages are managed through the Python Pakcage Index, abbreviated PyPI, and pronounced “pi-pi”. Packages come in multiple different versions and with their own dependencies, so managing the installation of the third-party packages a certin program or code base depends on can be a challenging task.
Adding Dependencies
You can use the uv tool to install and manage dependencies for your project. To add a package,
use the command uv add <package_name>, where <package_name> is the name of the package as
it appears on the Python Package Index (PyPI). You can specify a details about the version(s) of the
package your project can work with – for example, a minimum and/or maximum version. These details
get recorded in the pyproject.toml file when you execute the uv add command. Additionally,
uv will actually install a specific version of the package. Details about the specific version
are recorded in the uv.lock file, including the sha256 hash of the content of any package
installed.
Note that adding a single package may result in downloading multiple packages if the package being added has dependencies. In that case, the toml file will include just the package specified to the add command, while the lock file will include an entry for every package installed.
Below are some examples of adding packages with uv. Use the examples to add fastapi, pydantic
and uvicorn to your project.
[coe332-vm]$ cd class-work

# add a package
[coe332-vm]$ uv add fastapi

# or add multiple packages at once
[coe332-vm]$ uv add uvicorn pydantic

# check the results
[coe332-vm]$ cat pyproject.toml
[project]
name = "class-work"
version = "0.1.0"
description = "Add your description here"
readme = "README.md"
requires-python = ">=3.14"
dependencies = [
    "fastapi>=0.128.0",
    "pydantic>=2.12.5",
    "uvicorn>=0.40.0",
]
Take a look at uv.lock file generated:
[coe332-vm]$ cat uv.lock

version = 1
revision = 3
requires-python = ">=3.14"

[[package]]
name = "annotated-doc"
version = "0.0.4"
source = { registry = "https://pypi.org/simple" }
sdist = { url = "https://files.pythonhosted.org/packages/57/ba/046ceea27344560984e26a590f90bc7f4a75b06701f653222458922b558c/annotated_doc-0.0.4.tar.gz", hash = "sha256:fbcda96e87e9c92ad167c2e53839e57503ecfda18804ea28102353485033faa4", size = 7288, upload-time = "2025-11-10T22:07:42.062Z" }
wheels = [
    { url = "https://files.pythonhosted.org/packages/1e/d3/26bf1008eb3d2daa8ef4cacc7f3bfdc11818d111f7e2d0201bc6e3b49d45/annotated_doc-0.0.4-py3-none-any.whl", hash = "sha256:571ac1dc6991c450b25a9c2d84a3705e2ae7a53467b5d111c24fa8baabbed320", size = 5303, upload-time = "2025-11-10T22:07:40.673Z" },
]


. . .

[[package]]
name = "typing-inspection"
version = "0.4.2"
source = { registry = "https://pypi.org/simple" }
dependencies = [
    { name = "typing-extensions" },
]
sdist = { url = "https://files.pythonhosted.org/packages/55/e3/70399cb7dd41c10ac53367ae42139cf4b1ca5f36bb3dc6c9d33acdb43655/typing_inspection-0.4.2.tar.gz", hash = "sha256:ba561c48a67c5958007083d386c3295464928b01faa735ab8547c5692e87f464", size = 75949, upload-time = "2025-10-01T02:14:41.687Z" }
wheels = [
    { url = "https://files.pythonhosted.org/packages/dc/9b/47798a6c91d8bdb567fe2698fe81e0c6b7cb7ef4d13da4114b41d239f65d/typing_inspection-0.4.2-py3-none-any.whl", hash = "sha256:4ed1cacbdc298c220f1bd249ed5287caa16f34d44ef4e9c3d0cbad5b521545e7", size = 14611, upload-time = "2025-10-01T02:14:40.154Z" },
]

. . .
At the very top, we see metadata about the version of uv.lock itself (version 1, revision 3). Then we see information
about our project. First, we notice that the Python version must be 3.14 or greater — this is the same as what was in the
toml file.
But then we see a list of entries starting with [package]. These are all of the third-party packages that our code depends
on. Notice that we see many packages that we did not specify, like annotated-doc and typing-inspection. Why is that?
For each package, uv not only records the exact version (e.g., 0.4.2 of typing-inspection) but also the sha256 hash
of the package, the dependencies of that package, and other metadata. Thus, while the pyproject.toml file
describes the minimum specification of packaged needed, the uv.lock file described the exact environment needed to
reproduce the Python environment used with the project code. Thus, the uv.lock file is an essential tool for reproducible
environments.
VSCode IDE via Remote-SSH Extension
Now we will connect to code installed on the VM using VSCode and the Remote-SSH extension.
The easiest way I have found to do this is to create an SSH config file with an entry for your VM, and then use that alias in VSCode.
For more details and alternatives, see the documentation for Remote SSH [1].
Instructions for Mac and Linux
Install VSCode and SSH client on your machine, if not already installed.
Install the Remote-SSH client. Go to Extensions (Ctrl+Shift+X), type “Remote-SSH” and click
InstallOn your local laptop, edit the file ~/.ssh/config to contain the following:
Host 332-vm
    User ubuntu
    HostName 10.10.xx.yy
    IdentityFile ~/.ssh/id_ed25519
    ProxyCommand ssh -o 'ForwardAgent yes' <tacc_user_name>@coe332-2026.tacc.cloud 'ssh-add && nc %h %p'
In the above config file, be sure to replace:
10.10.xx.yy– replace this with the IP address of your actual student VM.<tacc_user_name>– replace with your TACC username (and remove the<>).
Here we have added an entry that will use a proxy command that will first SSH to
coe332-2026.tacc.cloud before SSHing to the actual student VM.
Note
You need the 10.10.xx.yy IP address for your server in the above (i.e., the values for “xx” and “yy”).
You can use the command ip addr on your student VM to get the
address. Alternatively, look on the coe332-2026 server for a file ~/.ssh/config which should
list your IP there.
Each entry in the config file instructs SSH about how to connect to that host. Once entered, SSH’ing to a host in the config is as easy as using the alias:
$ ssh 332-vm
- Notes:
In the first line, the part after
Hostis the alias. You can use any name you like, but it should be memorable.The string after
Usershould be the remote account to connect with.The part after
HostName(i.e., the10.10.xx.yy) should be the actual IP address of your student server.
Instructions for Windows
Some students have gotten the instructions above to work in Windows, but here, we provide an alternative that should work in Windows Powershell (note, not Windows Subsystem for Linux). The initial SSH key setup in this procedure is a little different.
First, check if you already have SSH keys on your local machine:
$ ls ~/.ssh/id_*
If you see files like id_rsa, id_ed25519, or id_ecdsa, you already have SSH keys.
Note which one you have (we’ll use id_ed25519 as an example, but use whichever key type you have).
If you don’t have SSH keys, generate one:
$ ssh-keygen -t ed25519 -C "your_email@example.com"
Press Enter to accept the default file location (~/.ssh/id_ed25519) and optionally
set a passphrase.
Add your public key to your student vm
You now need to copy your public key to the ~/.ssh/authorized_keys file on your VM.
First, get your public key:
On Windows (PowerShell):
PS> Get-Content ~/.ssh/id_ed25519.pub | Set-Clipboard
Now, SSH to your VM using the two-step process described earlier:
[local]$ ssh username@student-login.tacc.utexas.edu
(enter password)
(enter MFA token)
[coe332-2026]$ ssh mbs-337
Once connected to your VM, add your public key to the authorized_keys file:
[coe332-vm]$ vim ~/.ssh/authorized_keys
In vim, press i to enter insert mode, paste your public key, then press Esc and type :wq
to save and exit.
While you are here, get the IP address for your VM (you’ll need this for the SSH config in step 5):
[coe332-vm]$ ip addr | grep 10.10
10.10.xx.yy # Copy this IP address
Create SSH config file
On your local laptop, edit the file ~/.ssh/config to contain the following:
Host student-login-jump
    HostName coe332-2026.tacc.cloud
    User your_tacc_username
    IdentityFile ~/.ssh/id_ed25519
    ForwardAgent yes

Host 332-vm
    HostName 10.10.xx.yy
    User ubuntu
    IdentityFile ~/.ssh/id_ed25519
    ProxyJump student-login-jump
For All Operating Systems
Confirm VSCode Can Read Your SSH Config File. First, in a VSCode window, open the Command Pallette (Ctrl+Shift+P) and type “remote-ssh: open SSH configuration file”, and then make sure that the path to the config file you edited above shows up.
4. Now, in a VSCode window, open the Command Pallette (Ctrl+Shift+P) and type “remote-ssh: Connect to host”, and then:
4a) You should see the alias appear (in my case, I have additional aliases, but the 332-vm is the one we want).
If you do not see it, there is probably an issue with your configs.

Remote SSH drop down with aliases from the ssh config file
4b) The first time, you will be prompted to select the OS type (choose Linux)
4c) Once you select the OS type, a new VSCode window will open up and connect to the machine.
New VSCode window with Remote SSH
Note
If you get a “connection timeout” error, you may need to increase the Remote SSH connection timeout in your VSCode settings. To do that, do the following: 1. Open the Command Palette in VS Code (Ctrl+Shift+P or Cmd+Shift+P on Mac). 2. Type and select “Preferences: Open Settings UI”. 3. Search for “Remote.SSH: Connect Timeout”. 4. Change the value from the default 15 to 30 (or higher, like 60).
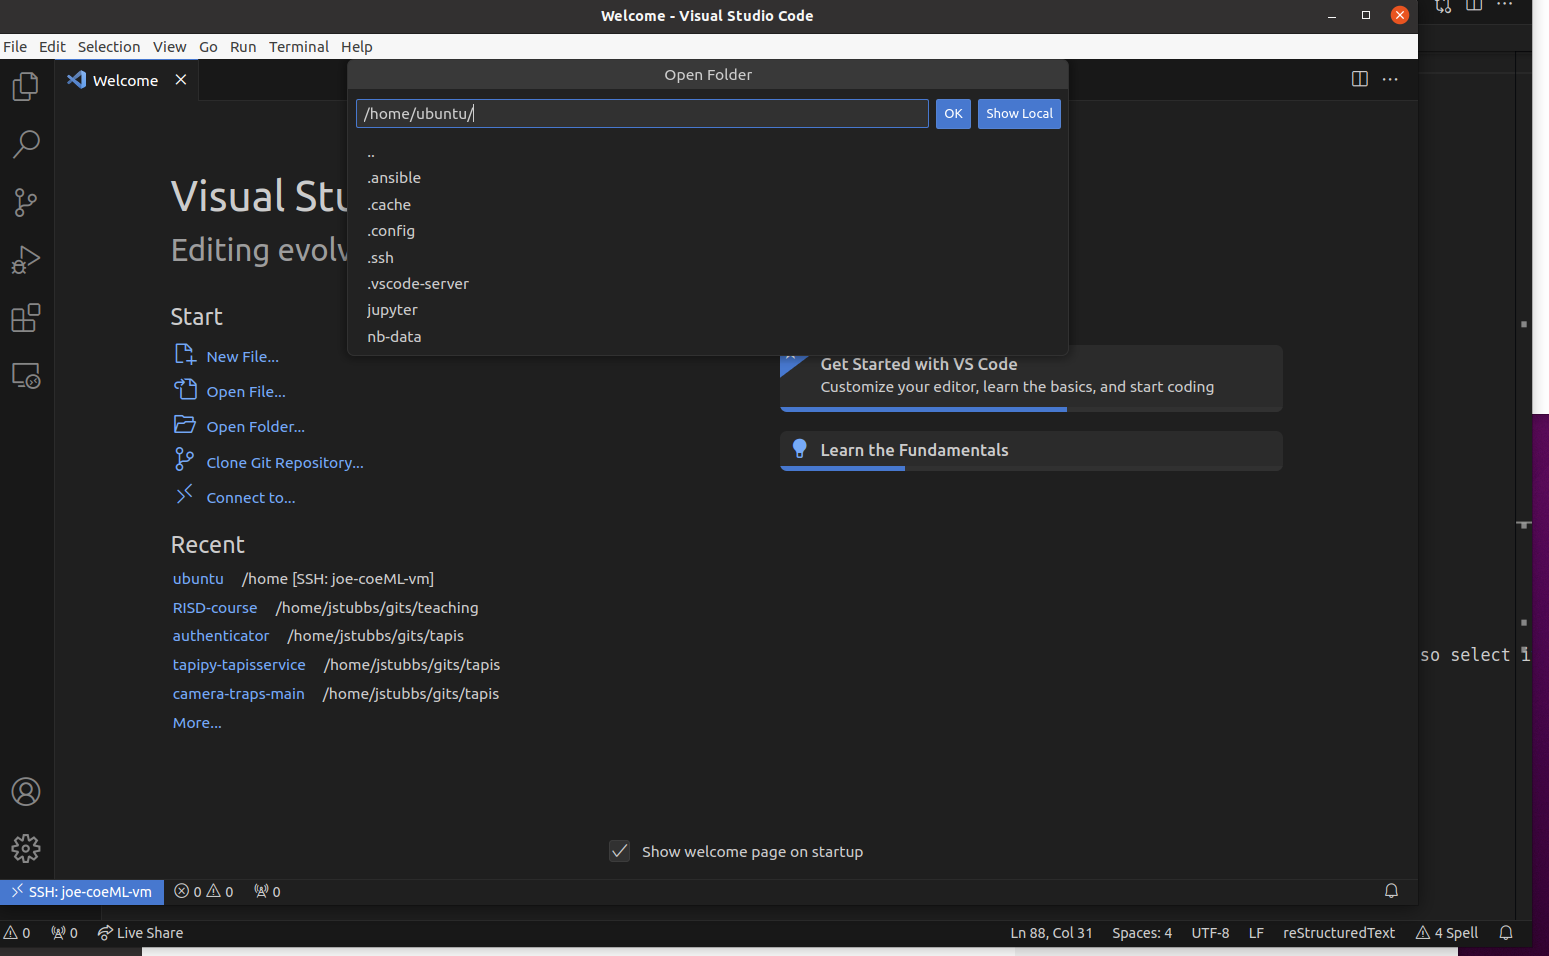
Choose the Open Folder... option and select the /home/ubuntu directory to see the
complete listing.

Remote listing of files on the VM
Configuring a Remote Python Environment
Finally, we’d like to point our VSCode instance at our uv environment. For that,
we first need to install the Python extension on the remote (ssh) host. To do that,
Open the Extensions view in the new window (Ctrl + Shift + X)
Search for the Python extension (by Microsoft)
Click
Install in SSH: <host>
With the Python extension installed in the remote, we now need to do the following:
Open the Command Palette (Ctrl+Shift+P) and search for Python: Select Interpreter.
A list will display the Python environments available on the remote machine
If not displayed, select the
Enter interpreter path...option.Enter the path to the Python binary in the
uvvirtual environment for the project. This should be something like:<project_root>/.venv/bin/python3.14. For example,/class-work/.venv/bin/python3.14
A Simple Test of the Remote Python Setup
As a simple test of the entire setup, open the main.py and add the line:
from fastapi import FastAPI
If the remote environment is configured correctly, this should “type check” without any
import errors since we added fastapi to the project dependencies in the pyproject.toml.
Turning on Type Checking
To get the most out of VSCode and static analysis, we recommend that you turn on type checking. For that, do the following:
Open VS Code Settings (File > Preferences > Settings).
Search for
python.analysis.typeCheckingModein the settings search bar.Change the value from off (the default might be basic or off depending on the setup) to
basicorstrict. a.basicprovides standard checks. b.strictprovides more comprehensive checks and is more likely to flag non-existent function imports.
Test it out by adding a line like the following:
from fastapi import foobar
This should highlight foobar with a red underline indicating that the symbol does not exist within
the fastapi package.
Note
If you set type checking to strict, VSCode will flag the FastAPI line as not being used unless you reference it elsewhere in your code. Unused imports should be avoided.
Terminals via VSCode
Another nice aspect of VSCode is that you can open terminals directly in the editor, and when you are using the RemoteSSH extension, the terminals opened will be terminals on the remote machine!
To open a new Terminal use the Command Pallette (Cmd+Shift+P or Ctrl+Shift+P) and type “Terminal” which should present the option: “Terminal: Create New Terminal”. Select this option, and you should a new terminal panel open up at the bottom of your VSCode window.

A terminal within the VSCode IDE.
You can see that the prompt contains ubuntu@student-1 letting you know it is connected to your student VM.